HTML
Duis aute irure dolor in reprehenderit in voluptate velit esse cillum dolore eu fugiat nulla pariatur. Excepteur sint occaecat cupidatat non proident, sunt in culpa qui officia deserunt mollit anim id est laborum.Learn more

Node.js is a powerful, open-source JavaScript runtime that allows you to build server-side applications with ease. If you’re looking to get started with web development beyond the client side, setting up your first Node server is a great way to begin. In this blog entry, we’ll walk through the essential steps to create your own Node server, covering everything from environment setup to writing your initial code. By the end of this guide, you’ll have a functional server up and running, and you’ll be ready to explore more advanced features of Node.js. Let’s get started!
In this tutorial, we will:

To get started, check if Node.js is already installed on your machine by typing node and npm in your terminal. You can confirm by running node -v and npm -v; this will display the version numbers, and you’ll want them to be above 20.x. If these commands don't work, don’t worry! You’ll need to download and install Node.js. Visit the official Node website at nodejs.org to get the latest version. The installation process is simple and should only take a few minutes. For Mac users, you can also install Node using the Homebrew package manager. Just run the command brew install node, and you’ll be good to go! Let’s ensure you’re all set up so we can dive into building your Node server.

Create a new directory for this tutorial, and then cd into it:
mkdir first-node
cd first-node
Open up your editor for this directory, then create a file named index.js


You can create a simple web server in Node using its built-in node:http module. Write these lines of code into your index.js:
                  // Basic Web Server Example
                  const { createServer } = require('node:http');

                  const server = createServer((req, res) => {
                    res.statusCode = 200;
                    res.setHeader('Content-Type', 'text/plain');
                    res.end('Hello World');
                  });

                  server.listen(3000, '127.0.0.1', () => {
                    console.log('Server is running...');
                  });
This is Node.js's version of the classic "Hello World" example, and the best part is you don’t need to install anything to run this script; it utilizes Node's built-in capabilities.The code includes some key concepts worth noting
First, we use the require statement to include a specific Node module. The require function, which appears at the beginning, helps manage module dependencies. It allows one module, like server.js, to access and use the functionality of another module, such as node:http. In this example, the built-in node:http module is essential for creating a web server. While there are many libraries available for building web servers, this one comes pre-installed with Node.js, so there’s no additional setup needed - just remember to require it.

Next, we set up a new server that responds with a status code of 200 and sends the message "Helloworld" whenever a client accesses the site. We create a server object using the createServer function from the node:http module, which provides various functions to help us build web servers. This function requires a parameter called the Request Listener. The createServer function is responsible merely for creating the server object; it does not actually start the server. To activate the web server, you must call the listen method on the server that you've created.
We then instruct the server to listen on localhost at port 3000. In Node.js, a listener function is linked to a specific event and executes whenever that event occurs. In this case, Node will run the request listener function each time there’s an incoming connection to the web server. That’s the event triggering our listener function. Let's dig a little bit deeper:

The listener function takes two parameters:
1. The request object, referred to as req in this example. This object allows you to access details about the incoming request, such as the requested URL and the IP address of the client making the request.
2. The response object, named res in this example. This object enables you to send responses back to the requester. In this simple web server setup, it sets the response status code to 200 to signify a successful response, and it writes back the "Hello World" text with the Content-Type header set to text/plain using the end method of the res object.
The listen method accepts several parameters, including the operating system port and host to be used for the server. The final argument is a callback function that will be triggered once the server is successfully running on the designated port. (We'll explain what exactly a callback function is in a dedicated blog post.) In the example above, this function simply logs a message to confirm that the server is operating correctly.

You can execute your server by running:
node index.js

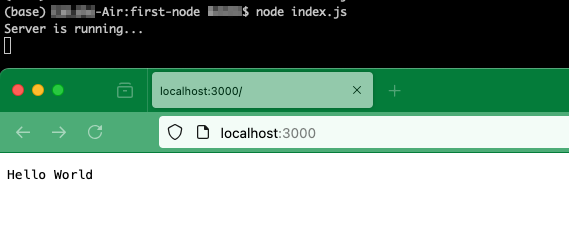
Node will run a web server, and you’ll notice that the Node process does not exit in this example. It has work to do in the background. It waits for users to request data and serve them a plain “Hello World” text when they do.
While the server is running, go to a browser and ask for an http connection on localhost with the port that was used in the script (3000 in this case). You will see the Hello World text that this example had in its request listener function. To stop the web server, press CTRL+C in the terminal where it’s running.
Congratulations, you just created your first web server with node.

Duis aute irure dolor in reprehenderit in voluptate velit esse cillum dolore eu fugiat nulla pariatur. Excepteur sint occaecat cupidatat non proident, sunt in culpa qui officia deserunt mollit anim id est laborum.Learn more

Duis aute irure dolor in reprehenderit in voluptate velit esse cillum dolore eu fugiat nulla pariatur. Excepteur sint occaecat cupidatat non proident, sunt in culpa qui officia deserunt mollit anim id est laborum. Learn more

Duis aute irure dolor in reprehenderit in voluptate velit esse cillum dolore eu fugiat nulla pariatur. Excepteur sint occaecat cupidatat non proident, sunt in culpa qui officia deserunt mollit anim id est laborum.Learn more

Lorem ipsum dolor sit amet, consectetur adipisicing elit, sed do eiusmod tempor incididunt ut labore et dolore magna aliqua. Ut enim ad minim veniam, quis nostrud exercitation ullamco laboris nisi ut aliquip ex ea commodo consequat.Learn more

Duis aute irure dolor in reprehenderit in voluptate velit esse cillum dolore eu fugiat nulla pariatur. Excepteur sint occaecat cupidatat non proident, sunt in culpa qui officia deserunt mollit anim id est laborum. Learn more

Duis aute irure dolor in reprehenderit in voluptate velit esse cillum dolore eu fugiat nulla pariatur. Excepteur sint occaecat cupidatat non proident, sunt in culpa qui officia deserunt mollit anim id est laborum. Learn more

Duis aute irure dolor in reprehenderit in voluptate velit esse cillum dolore eu fugiat nulla pariatur. Excepteur sint occaecat cupidatat non proident, sunt in culpa qui officia deserunt mollit anim id est laborum.Learn more

Duis aute irure dolor in reprehenderit in voluptate velit esse cillum dolore eu fugiat nulla pariatur. Excepteur sint occaecat cupidatat non proident, sunt in culpa qui officia deserunt mollit anim id est laborum. Learn more