Launch Your First Full-Stack App:

Get Started with React and Node


squirrel-construction-worker

Are you interested in becoming a full-stack web developer? In this blog post, we'll explore how to set up a modern web application using React for the front end, Vite for a fast development experience, and Node.js for your backend. This powerful combination allows you to build dynamic, responsive applications with ease. With React’s component-based architecture, you can interactive user interfaces, while Vite ensures quick startup and hot module replacement, optimizing your development process. On the backend, Node.js can handle server-side logic and database interactions efficiently. By the end of this tutorial, you’ll have a simple yet fully functional full-stack application. Let’s get started!

In this tutorial, we will:

0. Prerequisites

For this tutorial, I assume you got Node installed and a simple Node project already setup. If you are not sure how to do this, just read this tutorial where I explained how to do just that.

1. Setup Project

Blogpost sub-headline

Create a new directory for this tutorial, and then cd into it:
mkdir first-node
cd first-node
Open up your editor for this directory, then create a file named index.js


2. Create Basic Web Server

Paragraph heading

You can create a simple web server in Node using its built-in node:http module. Write these lines of code into your index.js:


                  // Basic Web Server Example
                  const { createServer } = require('node:http');

                  const server = createServer((req, res) => {
                    res.statusCode = 200;
                    res.setHeader('Content-Type', 'text/plain');
                    res.end('Hello World');
                  });

                  server.listen(3000, '127.0.0.1', () => {
                    console.log('Server is running...');
                  });
                

This is Node.js's version of the classic "Hello World" example, and the best part is you don’t need to install anything to run this script; it utilizes Node's built-in capabilities.The code includes some key concepts worth noting

First, we use the require statement to include a specific Node module. The require function, which appears at the beginning, helps manage module dependencies. It allows one module, like server.js, to access and use the functionality of another module, such as node:http. In this example, the built-in node:http module is essential for creating a web server. While there are many libraries available for building web servers, this one comes pre-installed with Node.js, so there’s no additional setup needed - just remember to require it.

Headline

Blogpost sub-headline

Next, we set up a new server that responds with a status code of 200 and sends the message "Helloworld" whenever a client accesses the site. We create a server object using the createServer function from the node:http module, which provides various functions to help us build web servers. This function requires a parameter called the Request Listener. The createServer function is responsible merely for creating the server object; it does not actually start the server. To activate the web server, you must call the listen method on the server that you've created.

We then instruct the server to listen on localhost at port 3000. In Node.js, a listener function is linked to a specific event and executes whenever that event occurs. In this case, Node will run the request listener function each time there’s an incoming connection to the web server. That’s the event triggering our listener function. Let's dig a little bit deeper:

Contact Page screenshot 2

The listener function takes two parameters:
1. The request object, referred to as req in this example. This object allows you to access details about the incoming request, such as the requested URL and the IP address of the client making the request.
2. The response object, named res in this example. This object enables you to send responses back to the requester. In this simple web server setup, it sets the response status code to 200 to signify a successful response, and it writes back the "Hello World" text with the Content-Type header set to text/plain using the end method of the res object.

The listen method accepts several parameters, including the operating system port and host to be used for the server. The final argument is a callback function that will be triggered once the server is successfully running on the designated port. (We'll explain what exactly a callback function is in a dedicated blog post.) In the example above, this function simply logs a message to confirm that the server is operating correctly.

3. Run Basic Web Server

Paragraph heading

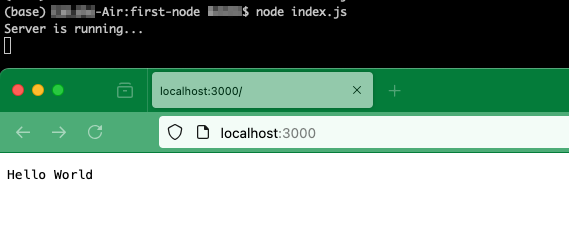
You can execute your server by running:
node index.js

Node will run a web server, and you’ll notice that the Node process does not exit in this example. It has work to do in the background. It waits for users to request data and serve them a plain “Hello World” text when they do. While the server is running, go to a browser and ask for an http connection on localhost with the port that was used in the script (3000 in this case). You will see the Hello World text that this example had in its request listener function. To stop the web server, press CTRL+C in the terminal where it’s running.
Congratulations, you just created your first web server with node.

Blog Posts

Start with Django

If you’ve been curious about web development, starting your journey with Django might just be the right choice for you. As a powerful framework, Django is designed to help developers build web applications more easily and efficiently.
Read more

HTTP requests: A beginner's guide

If you're just starting your web development journey, you've likely come across the term "HTTP requests." But what exactly are they, and why are they so important? Don’t worry; we’re here to break it down in a simple and approachable way!
Read more

Your first Node Server

Node.js is a powerful, open-source JavaScript runtime that allows you to build server-side applications with ease. If you’re looking to get started with web development beyond the client side, setting up your first Node server is a great way to begin.
Read more

Email Contact Form in Django

You’re probably aware that a contact form is a crucial component for many websites. In this tutorial, we will guide you through the process of creating a simple yet functional email contact form using Django.
Read more

Your First Full-Stack App

In this blog post, we'll explore how to set up a modern web application using React for the front end, Vite for a fast development experience, and Node.js for your backend. This powerful combination allows you to build dynamic, responsive applications with ease.
Read more

Routing in Express

In Express, a popular web framework for Node.js, setting up routes allows you to build dynamic, user-friendly applications effortlessly. In this tutorial, we’ll cover the essential concepts of routing in Express, including how to create routes, define route parameters, and handle different HTTP methods.
Read more