6. Work with the project in your IDE or text editor
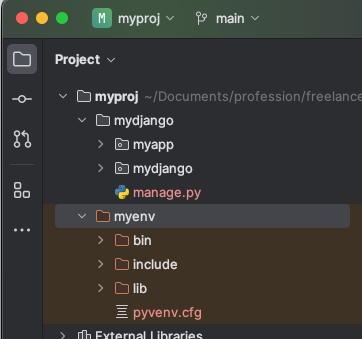
We’re almost finished with the setup process! Now it’s time to dive into the coding. Open your favorite text editor or IDE and select "Open Project." For a Django project, the Pycharm IDE is a good option. Navigate to the directory where your Django project folder is located. In this case, you’ll want to select the outermost directory that contains both the virtual environment and all the subdirectories you’ve created subsequently. At this point, you should notice that Django has automatically populated both your app folder and the project folder with various Python files.

There are just a few more steps to complete the setup. First, create a new urls.py file inside your app directory and then add the app you created to the settings.py file under the installed apps section. The settings.py file contains essential configurations for your Django project, including a variable called INSTALLED_APPS. At the end of this list, simply add a new line with "myapp" before the closing brackets. Remember to include a comma after it, and then save your changes to the settings.py file.
                  INSTALLED_APPS = [
                    "django.contrib.admin",
                    "django.contrib.auth",
                    "django.contrib.contenttypes",
                    "django.contrib.sessions",
                    "django.contrib.messages",
                    "django.contrib.staticfiles",
                    "myapp",
                  ]
Next, open the existing urls.py file in the outer folder. At the top, you’ll need to modify the import statement: change from django.urls import path to from django.urls import path, include. This adjustment is necessary to inform Django about the secondary urls.py file that you will create, which will contain all the URLs relevant to your app. You can think of this process as navigating through a city: the top-level urls.py file indicates which street (app) you’re on, while the app’s urls.py file provides details about the specific house (URLs) within that street.
In the existing urls.py file, there'll already be a list of urlpatterns, having one entry only:
                  urlpatterns = [
                    path("admin/", admin.site.urls),
                    ]
We are going to just add another line to this list:
                  urlpatterns = [
                    path("admin/", admin.site.urls),
                    path('', include('myapp.urls')),
                    ]
Save the file. If you haven't done so already, now create the urls.py file for the myapp app. If you’re using an IDE, you can simply right-click on the folder, select "New," and then choose to add a new file. Alternatively, if you prefer the terminal, navigate to the directory where you want the new file to be created and run the command touch urls.py. Inside this new urls.py file, include the following lines:
                  from django.urls import path
                  from . import views

                  urlpatterns = [
                  path('', views.home, name='home'),
                  ]
The import statement for views signifies that we require access to the views.py file, which is already located in the myapp directory. Don't forget to include a comma at the end of the import line, as it's crucial. It's also worth mentioning that there isn’t a view function called home present in the views.py file yet, which is why we will create it in the upcoming step.
Keep in mind that when constructing a new website or sub-site in Django, you need three fundamental elements: a URL for routing, a view function, and a template featuring the appropriate HTML file.


